什么是 icestark
icestark 是一个面向大型系统的微前端解决方案
不知道它的可以查看它的官方文档。
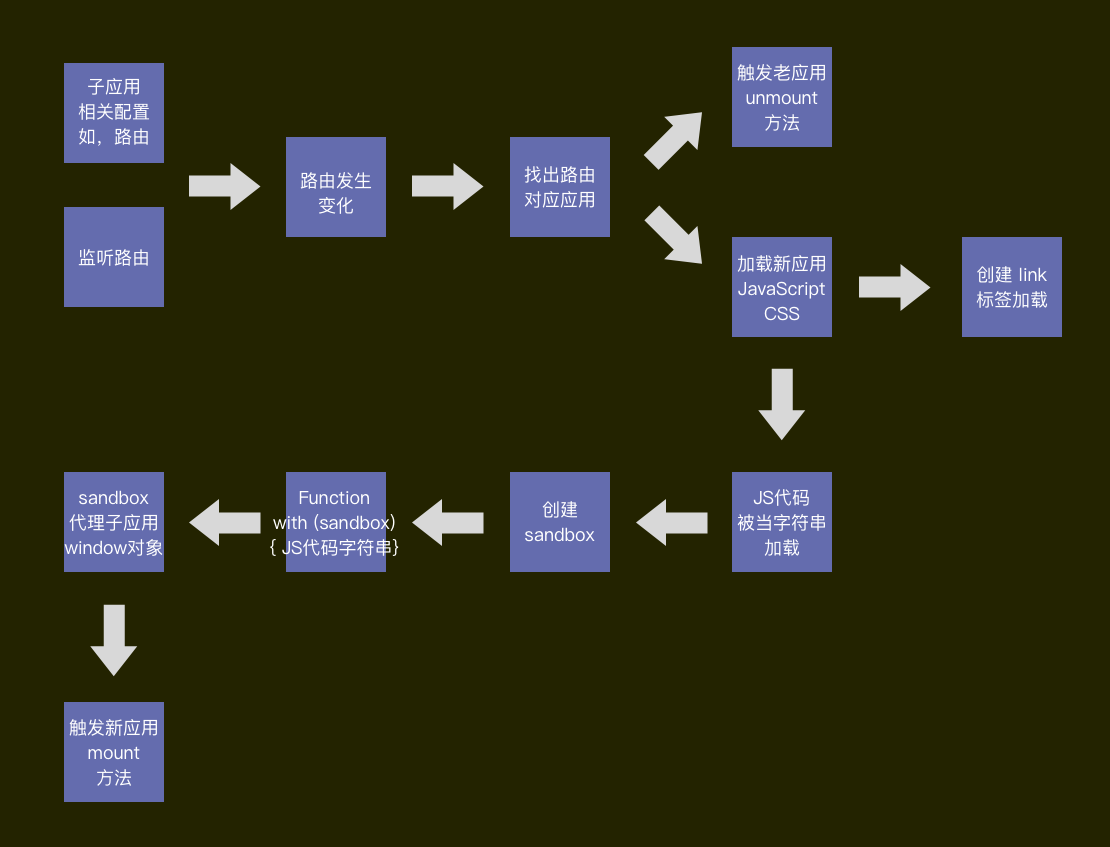
沙箱原理
perf_hooks.monitorEventLoopDelay([options])
resolution: The sampling rate in milliseconds. Must be greater than zero. Default: 10.Creates a Histogram object that samples and reports the event loop delay over time. The delays will be reported in nanoseconds.
Using a timer to detect approximate event loop delay works because the execution of timers is tied specifically to the lifecycle of the libuv event loop. That is, a delay in the loop will cause a delay in the execution of the timer, and those delays are specifically what this API is intended to detect.
监控 EventLoop 运行情况是判断系统是否健康的重要指标之一,如果有大量的延迟,说明系统存在密集计算,降低了系统的吞吐。Node.js 在 v11 版本引入了monitorEventLoopDelay,而之前需要自己去实现。
书接上文 Node.js 服务支持多 SSR 版本,之前的架构只是支持 SSR 应用的版本切换,最近为了支持微前端多版本切换(每个子应用也可自己配置自己的版本号),因为 SSR 和纯前端有较多差别所以又做了一套,之后会做一定合并,抽出底层,上层逻辑以插件形式注入。
libuv 在 v1.36.0 之后移除了 gyp_uv.py (commit),没办法通过它去创建一个 libuv.a 静态链接库(v1.35 文档有详细的介绍),现在我们需要通过cmake去创建。
1 | // 下载 libuv |
之后 build 目录 如下,libuv_a.a 就是我们需要的 静态链接库。
通过 CLion 创建一个helloworld项目,在 CMakeLists.txt 里添加 libuv 相关的信息,将 libuv 的头文件和源码添加进来,最后把项目和 linuv 链接在一起
1 | cmake_minimum_required(VERSION 3.17) |
创建 main.cpp 文件
1 | #include <stdio.h> |
之后就能愉快的打断点调试 libuv 了
学习 libuv 或者其它 C/C++相关的技术,感觉又回到了刚开始学习编程的时候,很多的不懂和挑战,不再像用 JavaScript 那样随心所欲,但是越是对底层的学习,越是能了解计算机原理,职业寿命才能变得更长。出于兴趣也好,出于无奈也好,总之新的学习让一切又变得有意思起来。
这是一个比较熟悉的模块,早在 Node.js V0.8 版本的时候就已经被加入进来,平时在生产部署 Web 应用的时候,为了充分压榨多核 CPU,总是根据核数开启对应的数量的应用进程,来处理用户请求,这些在 PM2 工具 或者 Egg.js 框架里有相应的介绍,之前自己写的 简单梳理 Node.js 创建子进程的方法(下)—— cluster 有其原理介绍。
虽然 Cluster 已经很成熟,但是也有一些问题:
在 Node.js V10.5.0 加入,但需要通过--experimental-worker开启,直到 V12 才默认支持。在密集计算任务处理上带来了新的解决方案。
我带领的团队有一个重要的业务需求,就是服务端渲染(SSR),我们使用 Egg.js 的 Cluster 模式来帮助我们提升吞吐量。虽然业务问题解决了,但是 Egg.js 比起 Express 或者 Koa 这样的框架来说复杂很多,让一个前端同事学习或者招募有经验的新同事还是有点棘手。另外就是和其它非其生态圈的工具搭配使用也遇到不少麻烦。
好在 Worker Threads 同样可以压榨 CPU,提升整体吞吐量。
Update your browser to view this website correctly. Update my browser now